Oct 25, 2012

Pie, Pie, Me Oh My...


"Nothing tastes sweet, wet, salty and dry all at once, so well it's pie. APPLE! PUMPKIN! MINCED an' WET BOTTOM!  Come to your place everyday if you've got em' PIE! Me O my I LOVE PIE!"
I love to bake! I have always loved to bake. It isn't something I learned to love out of necessity like cooking after I got married. I love everything about it... I love the smells. I love the warmth of the kitchen from the hot oven. From the crack of the egg to the first gooey, warm, sweet bite I am home...my kitchen is filled with sweet smells and sweet memories of laughter and love with friends and family.

But alas, I digress...we're talking pies not reminiscing.  And as you may well know all baking is not equal. I have been terrified of pies the whole of my baking life. Oh, this is not to say that I haven't made them. I love pie too much to abstain wholey from its delicious presence in my oven. But, each time I am left with all these questions...How to get the crust flaky, tender, and sturdy? How to create beauty and preserve flavor? How to assure the filling is as flavorful as the crust? and I could go on.

Recently, I decided it was time to face my fears...i mean I am woman, right? Here me roar...?

I of course went to Pdub because her style and flavors most resemble my own and because she often has great tutorials. After a quick "pie crust" search I found "Pam's Pie Tutorial"...I got to work right away on the beautiful pie creation you see above. 
APPLE PIE! Truly the quintessential pie flavor, right? If I can make a great apple pie I can make a great any kind of pie.  Not only did this tutorial help me slay my fears but actually made me begin to feel like a master. Yes, after only one pie creation I am feeling like a master pie baker :) The crust was flaky, tender and oh, so very delicious. Now, don't get me wrong, I've always enjoyed the flavor of pie crust but I never knew it could taste like this...buttery, warm melt in your mouth goodness. My husband and I just couldn't stop talking about the crust or the filling for days after.

If you too have pie fears that you have long wanted to conquer then here is the tutorial for you! (I don't usually promote other sites on here but this one deserves it and some:)

PAM'S PIE TUTORIAL - Although, I am including the basic recipe below. I suggest you click the hyperlink and check out the full tutorial. Which gives detailed information on what fats to use and why (I have said bye, bye to Crisco forever), rolling techniques and filling tips.

This is the recipe I used. It is PAM'S recipe and this is what she says...

This is the recipe I use.  I didn’t invent it. It can be found in many places and is as old as the hills. Keep in mind that the fat in the recipe can be any kind. Butter or a butter/lard combination can be substituted in any recipe that calls for shortening or other manufactured fat.
This is my go-to recipe for a flaky, beautiful two crust pie. Any time that I want a more sturdy crust, like when making a slab pie or a tart, I will use all butter for a total of one cup per recipe.
For a nine inch, two crust pie:
2 ½ cups all purpose or pastry flour
1 teaspoon salt
1 teaspoon to 1 tablespoon sugar (for a fruit pie. Omit sugar for a savory pie.)
¾ cup cold butter, cut into chunks
¼ cup cold leaf lard, cut into chunks
¼ cup cold water
Mix the 2 cups of the flour, salt and sugar together lightly in a mixing bowl or in the bowl of a food processor.  Add the butter and lard chunks and cut into the flour using a pastry cutter or by pulsing the food processor. The mixture should look like large crumbs and begin to cling together in clumps. Add the remaining ½ cup of flour and mix lightly or pulse the processor two or three times.  Do not over mix this flour. It should coat the clumps.  Sprinkle the water over the dough and with hands or a wooden spoon mix in until dough holds together.  Shape the dough into two discs. (see the full tutorial for "Rolling Techniques")

Jan 23, 2012

Coconut Cake - A Diaz Men Recipe


Sunday dinner is a special time in our home.  We always try to have a special meal and when possible a special dessert.  Yesterday i asked everyone what we should have and received a resounding..."I don't know!"  Thanks to pinterest we pulled up my dessert board and the men of the house declared Coconut Cake the winner.  I said "happy baking" because I had just finished preparing a big meal and was left with no desire to prepare a "from scratch" cake no matter how yummy it might be.  They got busy and a couple of hours later this was their creation.


Not only does it look great but it tasted delicious!   I love a cake made from scratch and this one was excellent. The cake itself is simply wonderful vanilla.  The frosting by consensus wasn't our favorite but it was good.  It wasn't the taste we weren't crazy about it was just very similar to marshmallow cream which we aren't crazy about.  When we make this again we decided it should have some type of whipped cream frosting.  All in all it was a hit and I am ecstatic because I have been searching and baking trying to find a really good vanilla cake and i finally did!
Great job my handsome bakers!

Can we say S.I.L.L.Y.?

Recipe thanks to "The Heritage Baker"

Classic Coconut Cake
Modified recipe from Southern Cakes by Nancie McDermott
Yield: 8 to 10 servings; enough frosting for any layer cake, 2 (9×13-inch) cakes, or 3 to 4 dozen cupcakes
INGREDIENTS
Cake
  • 3 cups all-purpose flour
  • 2 tsp baking powder
  • 1/2 tsp salt
  • 1 tsp vanilla extract
  • 1 cup milk (or unsweetened coconut milk, if desired)
  • 1 cup (2 sticks) butter, softened
  • 2 cups sugar
  • 4 eggs
Frosting
  • 1 cup granulated sugar
  • 1/4 cup light corn syrup
  • 1/4 cup water
  • 2 egg whites
  • 1/4 tsp salt
  • 1/4 tsp cream of tartar
  • 1 tsp vanilla extract
  • About 3 cups sweetened shredded coconut
METHOD
To Make the Cake:Preheat the oven to 350°F. Grease and flour 2 (9-inch) round cake pans. In a medium bowl combine the flour, baking powder, and salt. Whisk together well. Set aside. In a measuring cup, stir the vanilla into the milk.
In a large bowl beat the softened butter on medium speed until creamy. Add the sugar and continue beating, scraping down the sides and bottom of bowl twice, until the mixture is light and evenly combined. Add the eggs, one at a time, beating well between each addition, until the mixture is thick and smooth.
Add 1/3 of the flour mixture and beat on low speed until completely incorporated. Add 1/2 the milk/vanilla, beating well. Beat in another 1/3 of the flour mixture, then the remaining milk, and finally the remaining flour, beating well each time until the batter is very thick and smooth.
Quickly scrape the batter into the prepared cake pans, dividing it evenly, and place them in the oven. Bake for 25 to 30 minutes, until the cakes are golden brown, spring back when touched lightly in the center, and begin to pull away from the sides of the pans.
Place the pans on wire racks and cool for 10 minutes. Remove the cakes from the pans and place back on the racks, right side up, to finish cooling completely. Once cool you have the option of splitting each layer in half to create 4 thinner layers.
To Make the Frosting:Bring about 3 inches of water to an active simmer (bubbles breaking the surface regularly) in a medium saucepan. Meanwhile, in a heat-proof bowl that fits snugly into the saucepan, combine everything except the vanilla. Beat with a mixer at low speed for 1 minute, until the mixture is pale yellow and very foamy.
Place the bowl over the simmering water and beat at high speed for 7 to 14 minutes or more, until the frosting becomes white, thick, and shiny, and triples in volume. Continue beating until the frosting forms firm peaks and loses some of its shine. Remove the bowl from the heat, add the vanilla, and continue beating for 2 minutes more.
To Frost the Cake:Place one cake layer, top-side down, on a cake stand or serving plate. Cover it generously with frosting and sprinkle with some of the coconut. Place the second layer on top of the first, top-side up. First frost the sides to help keep the cake steady, and then spread frosting generously over the top, completely covering the cake.
Place the cake stand or serving plate on a baking sheet to catch any loose coconut as you sprinkle it onto the cake. Once the top is covered, gently pat coconut handfuls of coconut onto the sides. Make sure there are no bare spots.
Transfer any unused coconut to a jar or resealable plastic bag and store it in the freezer.

Jan 18, 2012

Warm Bacon Cheese Spread


The first time I had this recipe was on a visit at Christmas time with Caprece and her still small but ever so sweet family. It was the holiday season and we were all the time whipping up yummy things to snack on while we visited with family and friends. This wonderful one landed on the New Year's Eve Menu - we love snack foods for New Year's Eve fixins. It was comfort food at its finest, warm, bread, cheesy and bacon to boot. How can you go wrong with that combination? We ate it with everything...celery, carrots, crackers, chips, and pieces of warm crusty bread until it was gone...every last warm cheesy bite. Note* This was over several days - it re-heats really well - not all at once :) Although it was yummy enough to do just that.

I made this for our Christmas book club meeting.  Here is a picture of the spread...more recipes to come!
Caprece would have been proud! :)


Warm Bacon Cheese Spread
  • 1 round loaf (1 pound) sourdough bread
  • 1 pkg. (8 ounces) cream cheese, softened
  • 1-1/2 cups (12 ounces) sour cream
  • 2 cups (8 ounces) shredded cheddar cheese (I use sharp but it is your preference)
  • 1-1/2 teaspoons Worcestershire sauce
  • 3/4 pound sliced bacon, cooked and crumbled (I am not a fan of cooking bacon - the smell lingers far too long - so I use pre-cooked bacon pieces - you can find them in the salad fixins section of the grocery store)
  • 1/2 cup chopped green onions
Assorted Crackers, vegetables, and chips.

Cut the top fourth off the loaf of bread; carefulliy hollow out the bottom, leaving a 1-in. shell.
you can see this in my picture at the top


I cut the bread crosswise like this and then pull each piece out gently. You want to be gentle because you are going to cube the bread to be used for dipping. After I remove the pieces then I just continue to hollow out the bread until I have a 1-in. shell. Cube the removed pieces and place in a ziplock to keep fresh until later. Take the lid (the top of the bread that you sliced and cube it as well so it can be used for dipping).

In a mixing bowl, beat the cream cheese. Add the sour cream, cheddar cheese and Worcestershire sauce until combined; stir in bacon and onions. Spoon into bread shell. Place lid pieces back on the top of the shell. Wrap the shell in a piece of heavy-duty foil or double wrap with regular foil, Bake at 325 degrees for 1 hour. Serve with crackers, veggies and reserved bread cubes. Yield: 4 cups.

Jan 14, 2012

Lemon, Limon, Limone, Citron - How ever you say it....It means tart, buttery, melt-in-your-mouth delicious!


You know how they say necessity is the mother of invention?  Well that was the absolute case with this recipe.  We purchased a loaf of raspberry lemon bread at a local bakery ($7.00/loaf - yikes) as a treat.  Joaquin of course, fell in love with it.  See since he was an infant he has had an affinity for the wonderful tartness of the lemon.  Once while dining with some friends they thought it would be funny to give him the lemon from their water to watch his face scrunch up from the tartness of it.  They handed it to him with rapt anticipation only to be sadly disappointed. When he tasted it there wasn't any reaction from the tartness only delight for the flavor.  He grabbed it and used it for a teething toy while we enjoyed dinner.  That was the beginning of his love affair.  I tell you if he had it his way he would put lemon on everything :)  He loves it on his rice and in his bean burritos and sometimes surprises me with can I have some on my fries :)
But I digress :)  

So, since of course I didn't want to pay $7.00 every time he got a craving for this lemony treat I knew I needed to come up with my own recipe.  After quite a bit of research and experimentation I came up with a recipe that is just about spot on!  It really is tart, buttery, melt-in-your-mouth goodness.

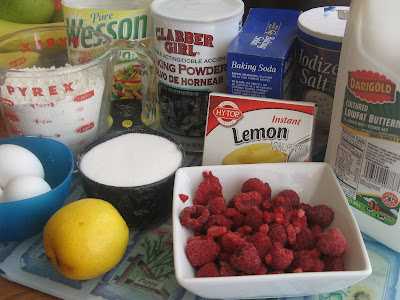
The Cast


  • 3 eggs
  • 3/4 cup oil
  • 1 lemon zested and juiced
  • 1 tsp lemon extract
  • 1/2 cup buttermilk
  • 1 cup sugar
  • 1 cup of raspberries (dusted with 1 TBS flour - this helps to keep them from all sinking to the bottom of the pan)
  • 1 box instant lemon pudding
  • 2 cups flour
  • 1 tsp baking soda
  • 1 tsp baking powder
  • 1/2 tsp salt


Directions:
Preheat your oven to 350 degrees.  Grease a large loaf pan.  Mix all the wet ingredients (raspberries are added at the very end and are folded in DO NOT use mixer for this step) and then add the dry ingredients mixing just until you have a smooth batter, about 3-5 minutes.  Gently fold in the raspberries. Pour batter into prepared loaf pan and bake for 45-55 minutes or until knife inserted comes out clean.  Allow to cool on rack for 5 minutes then remove from the pan and return to rack to cool completely.  Enjoy with a big cold glass of milk :)


This is the bread without berries...just as yummy!

Sep 2, 2009

Lime-Balsamic Tomato Salad

(Please Note** I had eaten half the tomatoes before I took the picture :)

Who doesn't like a ripe juicy summer tomato? Oh, I know plenty of people who don't but I am most certainly not one of them. I planted tomatoes myself this year and waited in anticipation for the yummy fruit only to be terribly disappointed. I found that my sweet little Zeke loved pulling the green fruit off the plants. We are in a condo so I did a container garden on my balcony. I often left the sliding glass door open to allow the boys to play and to enjoy the fresh air. How sad I was one day when I found several of the green tomato fruit rolling around on the balcony. I quickly scolded him and told him not to bother my fruit. However, I am not sure if it was a case of yearning for "the forbidden fruit" or what but he continued to pull the fruit off throughout the summer so no tomatoes from my garden. Boo Hoo! I did get lucky last week and received about a bushel from a local farm. I love, love, love tomatos. My mom said that as a child I would eat them like candy. I couldn't get enough. And just to let you know...I believe my tomato appetite is insatiable because 40 years later I still can't get enough!

This salad is my most favorite way to eat them well, next to a good ole tomato sandwich. It is simple yet bursting with flavor and goes well with almost anything. MM MM! I think I am gonna got get me some now!

PS And it doesn't hurt that they are considered a "super food"

Ingredients:
  • 4 whole tomatoes sliced - nice hearty slices. (you can use the beef steak or roma it depends on the season. When tomatoes are in season I use what I have grown in the garden or the local farmers market.)
  • 8 slices of red onion - sliced very thinly
  • 1/4 to 1/3 cup balsamic vinegar
  • 1 TBS of extra-virgin olive oil
  • 1 medium lime
  • salt
  • 1 tsp parsley or cilantro (depends on what I am serving the salad with)
You can make this salad one of two ways:

1 - make a vinegrette with the liquids and then pour over the sliced tomatoes and onion. Then season with salt and sprinkle the parsley over or

2. lay out the sliced tomatoes and onions in a dish and pour each ingredient over one at a time. This is how I make it. But, whatever works for you...go for it!

Sep 1, 2009

BAJIO CHICKEN CHILE QUESADILLAS


Remember yesterday when I posted the Bajio Chicken Chile Salad. Well, here I am again with a wonderful surprise...the leftovers make a delicioso second meal. I love crock-pot recipes but I love even more leftovers that can make great second meals!!! The Bajio Chicken Chile Salad is just such a recipe. I used the leftover chicken from our chicken chile salad and made quesadillas. It was a flavor explosion in my mouth.
Assembly of Quesadilla's -

Heat skillet on medium and spray lightly with cooking spray. Place a flour tortilla in heated pan and sprinkle cheese over tortilla. Drizzle the cilantro dressing over cheese. Spread the chicken chile over the cheese and then the black beans over the chicken. Drizzle with a little more dressing and then sprinkle a little more cheese. Top with a flour tortilla and cook until bottom tortilla is lightly brown (Please be careful not to burn!) Then flip over and cook until lightly brown. Slice like a pizza and serve over a bed of greens and a side of the green chile rice.

Aug 31, 2009

BAJIO CHICKEN CHILE SALAD


Remember the blog that inspired me to combine my blogs into one? Well she also had this yummy recipe that I tried recently. It is a copy cat recipe for Bajio Chicken Chile Salad. She says this recipe "came from Kara’s Kitchen Creations - a darling blog with lots of yummy recipes!".

Recipe adapted from Kara's Kitchen Creations

Bajio Chicken Chile Salad
5 chicken breasts (I only used 4 large ones)
1/2 cup salsa
1 Tbsp cumin
1/2 cup brown sugar (more to taste)
1 4 oz. can diced green chilies
6 oz. Sprite (1/2 can)
Combine all ingredients in a crock pot. Cook on low for 5-6 hours. Remove chicken and shred. Return to crock pot and cook 1 more hour. Thicken the juices with a little cornstarch mixed in water.
Serve with flour tortillas, lettuce, cheese, black beans and any other taco fixings.
If you want it spicer rather than sweeter add a hotter salsa and more green chilies.

Green Chile Rice (Serves 6)
1 cup rice
2 cups chicken broth
4 oz. green chiles
1 sm. onion, diced
1/3 cup fresh cilantro
1 tsp. oregano
1/2 tsp. salt
1-2 tsp. cumin
3 green onions.
Mix together and pour into greased 9 x 13 pan. Bake in the oven for 1 hour or until rice is done at 350.
NOTE*** If you plan to double the amount of rice you will have adjust cooking time appropriately. It will take about 15-20 min. longer.

Cilantro Salad Dressing (This gets rave reviews everytime I serve it)
1 pkg. Hidden Valley Ranch Dressing (dry mix)
1 cup buttermilk
1/2- 1/3 bunch of cilantro, chopped
1/2 – 1 small jalapeno (remove seed)
1 cup mayo
1 tsp. lime juice
1-2 tomatillos (remove outer papery skin)
1 garlic clove
Blend all ingredients in blender!

Building the Salad
I used sweet baby greens for the foundation of my salad.
Top the greens with the chicken.
Top the chicken with black beans.
Top the black beans with cheese.
Top the cheese with tortilla strips (I made my own).
Drizzle the cilantro Salad dressing over everything.
Serve with Green chili rice on the side.

Aug 30, 2009

Hello Dollies


While attending Utah State University my sister, Caprece, and I worked for the university catering department. It was a wonderful experience in which we learned a great deal about food and entertaining. It was also the perfect place for struggling college students because of the "free food" perk. Everyday we were permitted to eat what was termed leftovers. The leftovers were actually items that hadn't sold that day and wouldn't be fresh the next. One of our most favorite "leftovers" of all were the Dolly Madisons. She and I dreamed of them long after our college life ended with marriage and graduation. Nearly 10 years later she found the recipe. I am not sure if she ever tried the recipe but today when my 3 year old had a little sweet tooth I pulled out her tried and trues and found the recipe. I just had to have a little of this cookie full of nostalgia and rich gooey yumminess. Try it for yourself...you won't be able to stop with one.

Adapted from recipe by Debbie Ruse

1 package graham crackers (crushed)
1 stick of butter melted in 9 x 13 pan
Spread crackers over butter.

Sprinkle on top:
1 package milk chocolate chips (I used semi-sweet for a contrast with the gooey rich cooked sweetened condensed milk)
1 cup coconut
1 cup nuts (I used pecans just like the USU one)

Pour 1 can Borden's sweetened condensed milk over all. Bake for 30 minutes at 325 degrees. Cut around edges as soon as cool. Cut into squares. Refrigerate until firm.

Aug 24, 2009

FRUIT PIZZA


Caprece was a great collector of recipes. She was always on the look-out for a good one and she passed the bug on to me. Matt allowed me to copy all of her recipes a couple of years ago and they get plenty of use!

This is a recipe from her collection. Once while visiting our cousin in Kentucy she served this light refreshing dessert and Caprece had to have the recipe. I decided to make it after suffering from a craving for a dessert with fresh fruit. It is easy to make and tastes wonderful.

From Caprece's collection by Raina

Ingredients and Instructions:

CRUST
4 cups flour
2 sticks of butter
1/2 cup pecans
1 cup brown sugar

Mix all together. grease texas sheet pan and spread evenly over the pan(will not be smooth). Pat with hands. Bake at 350 degrees for 5-10 min(the longer it cooks the harder it gets so cook it to desired firmness) I like it on the softer side so I cook it for 6 minutes. Allow to cool completely.

TOPPING
1 large tub cool whip
2 8oz cream cheese
1 small box powdered sugar

Beat cream cheese then add coolwhip. Add sugar 1 cup at a time and mix well. Spread over cooled crust. Top with seasonal fruits. I used strawberries, blueberries and kiwi on this one.


Aug 21, 2009

Zucchini & Carrot a Scapece (Antipasti) grazie a Giada


This is the last of the new recipes I tried for our most recent bookclub meeting. Another suprisingly delicious antipasti. I had never had this before but it had the kind of flavors that one bite is just not enough of. This recipe is also from her "Everyday Pasta" book. It is pretty simple as well.

Ingredients:
6 TBS extra-virgin olive oil
5 large zucchini (about 2 pounds), cut in 1/4-inch rounds
Salt and freshly ground black pepper
3 garlic cloves, thinly sliced
1/4 cup fresh basil leaves, chopped
1/4 cup fresh mint leaves, chopped (I left these out and it was still wonderful)
10 medium carrots (about 1 pound), peeled and cut in 1/4-inch rounds
1/4 cup red wine vinegar

Heat 1/3 cup oil in a heavy large frying pan over medium-high heat. Working in batches, add the zucchini and fry until golden, about 2 minutes per side. Using a slotted spoon, transfer the fried zucchini to a baking dish. Sprinkle generously with salt and pepper. Sprinkle half of the garlic, basil, and mint leaves over the zucchini.

Add the remaining oil to the frying pan. Add the carrots to the hot oil and saute until golden, about 5 minutes. Using a slotted spoon, transfer the fried carrots to the dish of zucchini. Sprinkle generously with salt and pepper. Sprinkle the remaining garlic, basil, and mint leaves over. Drizzle the vinegar over the vegetable mixture and toss gently to coat. Cool to room temperature. Cover and marinate in the refrigerator overnight. Allow the vegetables to come to room temperature before serving. Transfer the scapece to a platter. Serve with bread, fish or chicken.

Aug 20, 2009

combo blog - coming soon

It has been a bit since I have posted a new recipe on my recipe blog due to the amount of time it takes to type up the ingredients and get a picture that is just right. I knew something had to change. I recently found a wonderful blog/recipe blog Your Homebased Mom or what I term a “combo” blog. She blogs about her life as well as recipes. I decided that was just the thing that I needed to do! It is less maintenance and keeps me all in one place. So I will very soon be introducing my new combo blog but, for now you can see all my recipes and new ones at www.karmenskreations.blogspot.com

RAVIOLI FRITO & ANTIPASTI - Giada De Laurentiis Style


Remember I said for my turn hosting book club I went with an italian theme for the food. It was a surprisingly simple and delicious experience. I just turned to Giada. I speak of her as if she is my friend...actually I feel like she is...her cookbooks are very user friendly for thos
e of us who aren't familiar with italian cuisine beyond spagetti and lasgna. I took all my recipes from her "Everyday Pasta" book. This first one is delicious and appears once platted that it takes great effort but looks are deceiving. It is nothing but easy and even better nothing but yummy! I had every plan to make a homemade marinara sauce but at crunch
time I went with Napa ValleyBistro Homemade-style marinara sauce by Mezzetta. I am so glad I did because it was unbelievably good for a store bought or homemade sauce and was the perfect complement to my ravioli frito. This recipe is a new family favorite.


Ingredients:
Olive oil, for frying
1 cup buttermilk
2 cups Italian-style bread crumbs
1 box store-bought cheese ravioli (about 24 ravioli)
1/4 cup freshly grated Parmesan
1 jar store bought marinara sauce, heated, for dipping
Directions
Pour enough olive oil into a large frying pan to reach a depth of 2 inches. Heat the oil over medium heat until a deep-fry thermometer registers 325 degrees F.
While the oil is heating, put the buttermilk and the bread crumbs in separate shallow bowls. Working in batches, dip ravioli in buttermilk to coat completely. Allow the excess buttermilk to drip back into the bowl. Dredge ravioli in the bread crumbs. Place the ravioli on a baking sheet, and continue with the remaining ravioli.
When the oil is hot, fry the ravioli in batches, turning occasionally, until golden brown, about 3 minutes. Using a slotted spoon, transfer the fried ravioli to paper towels to drain.
Sprinkle the fried ravioli with Parmesan and serve with a bowl of warmed marinara sauce for dipping.

Aug 17, 2009

Flourless chocolate cake


WARNING: THIS RECIPE IS ONLY FOR SERIOUS CHOCOLATE FANS!!

You see I am a fan...a fan of Bakerella...a fan of Paula Deen...and a die hard fan of C.H.O.C.O.L.A.T.E. It was a wonderful chain of events inspired by chocolate. It began with Paula and her "Chocolate Celebration 2008" magazine which in turn inspired Bakerella which in turn inspired me.

It was my turn this month to host the book club and I wanted to do something fun and yummy. We read the book "Galileo's Daughter" and I was at first trying to come up with some kind of food to do with the solar system or the stars (I know, funny right?) Then it hit me how simple it was. Galileo had a deep love for Florence (Italy that is), his home. As a result, I chose food from Tuscany the region of Italy in which Florence is located.

So naturally I thought of this delicious cake. Naturally? You ask. Naturally for me...Rodrigo took me to a very popular Italian restaurant,Cucina Rustica, while on our honeymoon in Sedona, Arizona and this was the very dessert we ate. This was not only the beginning of our love affair but of our love affair with Italian cuisine.

It was the first and last time I have eaten flourless chocolate cake until now. I was afraid of attempting the recipe myself as I often have this experience of food tasting better in my memory than in my real life re-creation. However, this one did not disappoint. It was as fabulous made right here in my home as it was sitting in that very pricey but wonderful restaurant. So, don't be afraid...go ahead...give it a try.

I'll list the ingredients here but, Bakerella gives such a wonderful explanation on preparing it that I'll just leave her link to it at the bottom.

What you'll need:

  • 9 inch spring form pan
  • parchment paper
  • non-stick cooking spray
  • 6 large eggs (yolks in one bowl and whites in another)
  • 8 0z semi-sweet chocolate
  • 4 oz dark chocolate
  • 2 sticks of butter (1/2 lb)
  • 1 1/4 cup sugar

Jul 20, 2009

Movie night - Popcorn Delight

Growing up we had popcorn every Friday night. My grandmother would pop some kernels in a pan with a bit of oil and some salt and "voila" we had the treat of all treats - POPCORN! She would then turn on the TV and we would munch while watching Love Boat, Fantasy Island or shhhhh! don't tell anyone "The Dukes of Hazzard". Popcorn became a must have treat for a night of favorite TV. I think I have tried it with everything....cheese, brown sugar and butter to create a carmel, caro syrup, and my least favorite of all butter. But never in all my experimenting did I find an ingredient that complimented popcorn quite so well as I did Friday night. See we love chocolate with our popcorn and even better chocolate covered raisans so my three year old and I concocted what you see below.


Chocolate Popcorn and Raisan Delight


Chocolate Covered Popcorn Explosion


Chocolate Popcorn and Raisan Delight or Chocolate Covered Popcorn Explosion
Ingredients:
Popcorn - as much or as little as you desire
3 squares of Chocolate almond bark
Raisans - I used golden (no raisans in the explosion)
Rainbow sprinkles (I didn't use sprinkles with the raisan delight)

Directions:
Make the popcorn as directed on the package and pour popped corn in serving dish. Sprinkle with raisans and toss. Melt the squares for 1 min and stir and then continue to melt at 30 second intervals until smooth. Drizzle chocolate over popcorn (use as much or as little as desired) for explosion add sprinkles and let chocolate dry. Then eat to your heart's content!